This is the sewing machine table I made for SWMBO in the mid ’90s. There are some photographic flaws that don’t reflect the project but are a result of 1 Hour Photofinishing and undetected hairs on my friend’s scanner.
The construction is large panels of oak veneer plywood. Most panels are banded by 2"" solid oak. The front doors are solid oak made on my router table with panel raising bit and cope and bead bit. The appliques on the ends and rear panel were also made with the bead bit.
Air lift and all hinges are from Rockler. The template for the table hinges is from Woodhaven. Wood drawer pulls and porcelain knobs are from Home Depot. It’s best to keep in mind that I built this cabinet more than twenty years ago. Some products (and sources) may no longer be available.

| The design is generally from a table we saw in a fabric store in Morris, Illinois. This is a picture of it from Horn of America’s website. The proprieter of the fabric store was kind enough to let me take lots of pictures and make measurements and drawings. (All pictures are thumb nails—click on them to see a larger view.)
|
|
The finish is idiot proof Watco Golden Oak. I experienced some of the bleed described by others, but I had no difficulty scraping it off. I would like to put some coats of varnish on, but I have to wrestle it away from SWMBO first.
It's heavy! The top(s) are removable, which is about the only way we can maneuver it around stairs and such. The casters are very effective, and it rolls around quite nicely, even on the carpet, for which the casters are not designed!
|
| | |
|

|

| These two pictures are front views.
|
|
|

| Here is how it looks as it gets opened up.
|
|
|

|
Here is the serger shelf up, the serger partially out, and the drawers open.
|
|
|

|
This is a detail of the serger shelf support. The round thing is a knob I turned that screws through the shelf into the support for stability. It found a serendipitous place for storage that was utterly unplanned. The cleat shape is to provide some mechanical stability to the support. There is a matching mortise underneath the folding shelf.
|
|
|

|
This is the shelf folded. You can see the hinges mortised into the top, as well as the tight miters of the banding.
|
|
|

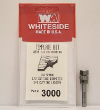
| I’ve been asked about the hinge mortising jig, as it seems it is no longer available at Woodhaven. This image shows two of them attached to a guide (bottom) as well as a home brewed one (at top). It’s no more difficult than tracing one’s hinge onto some ply stock, carefully cutting it out (should be a nice, snug fit to the hinge), and then using a top bearing, flush cutting ½" bit to rout to the proper depth. No need to duplicate the source I used.
|
The writing on the home brewed guide says:
- Templet for
- 1 3/16" sewing mach. Rockler 26765
- hinge knuckles
- 3/8" Router guide
- ¼" bit
- 13/64" height
|
|
|

| That means the templates were intended for use with a guide bushing (3/8") in the router base and a ¼" bit. The template I describe above requires a flush cutting bit, diameter immaterial (but commonly ½"), but no bushing. The bit height, of course, is dependant on the thickness of the hinge. Experimentation would be wise. The hinge #26765 is a current offering from Rockler.
|
|
|

|

| These two pictures show the rear panel up and down. The rule joint is visible in the down position.
|
|
|

|
This is a detail of the spring I made to hold the plastic insert in place when it is stored. When SWMBO (and others) first saw it, they asked, “what happened?” That is genuine sawdust in the picture as I hadn’t completely blown it out when I took the pics.
|
|
|

|
This is what it was all for. SWMBO’s pride and joy (well, besides me).
|
I’ve been asked how much I have in it, and I think probably about $600, including all the hardware and wood. The el-cheapo looking melamine version (shown above) is priced at over $1200, so I figure we did good.
I’'ve also been asked how many hours I have into it and my response is, “well, how do you calculate the hours spent laying in bed trying to figure out how best to do a glue-up or solve a problem or fix a boo-boo? How do you calculate the time when you do a dry fit and just sit down and stare at the project imagining how it’s going to look? How do you calculate the time when you realize you’ve butchered yet another part and stand there trying to figure the best way to fix it?” And that’s on top of all the regular construction hours.
I know where all the flaws are, so don’t point them out! I think every woodworker goes through that. SWMBO says she doesn’t even care. She’s happy with it the way it is. Maybe she’s just glad it’s finally done.


 Main Page
