First buy an insert. As you will see, this method is really difficult if you don't have an insert before you start. I bought the Rousseau (in fact, I now have three of them, each with a separate router attached to them), and I highly recommend it, however this technique will work with just about anything you use, including plate aluminum or plywood.
Temporarily place the insert plate on the table in the desired location. There are two ways to approch this—place it on the underside of the table, or place it on the top. If you use the underside, you can use nails in the next step, however double stick tape will allow you to place it on top. It's just temporary—this placement has nothing to do with the eventual use of the insert.
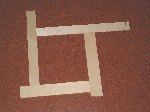
Fasten strips of wood approximately ¼" thick and about 3" wide to the table on all four sides of the insert, making a sort of a frame around it. Butt the strips snugly to the insert. You need to have a fairly contiguous surface around the insert, as this frame winds up being a template pattern and will support your router during the next step.
Length doesn't matter—if you arrange them as shown, you won't have to cut up any of your important thin wide scrap stock—just use them as you pull them out of the bin. Incidentally, this great tip (which I stole from Bob Rosendahl of The Router Workshop) works perfectly for setting up any sort of variable sized template or fixture without the necessity of precision cutting.
(Note: all pictures are thumbnails—left click on pic to see full size image.)
Rout out the hole using a template bushing and straight cutting bit combination that nets ¼" (for example, a ¼" bit and a ¾" collar, or a ½" bit and a 1" collar—it's the measurement from the outside of the collar to the edge of the bit that counts). Doing so will yield a hole in your table top ¼" smaller on all four edges than the size of the insert. Remove the strips.
Next chuck up your rabbeting bit, fitted with the correct size pilot to make a ¼" rabbet. Set the depth to be almost exactly the thickness of the insert, erring on the side of making too shallow a cut—you can always take another pass, but it's difficult to put wood back on if you cut too deep. Rout around the hole from the top of your router table and you will have a perfectly rabbetted insert hole, excepting, perhaps, the corners. The Rousseau corners are a different radius than my rabbetting bit, but fortunately a smaller radius, so I just did some hand chiselling to make it fit. A plate with square corners will require a little more work. Either machine the corners of the insert to a rounded profile (ideally matching the radius of your rabbeting bit), or chisel the corners of the rabbet square to fit the insert.
Note that because the hole is routed with a template fitted to the actual insert, it is very accurately sized. Consequently, anyone can easily cut a hole to very snugly fit their particular insert.
Here's a picture of the insert in my home built router table:
Last updated: 27 January 2009