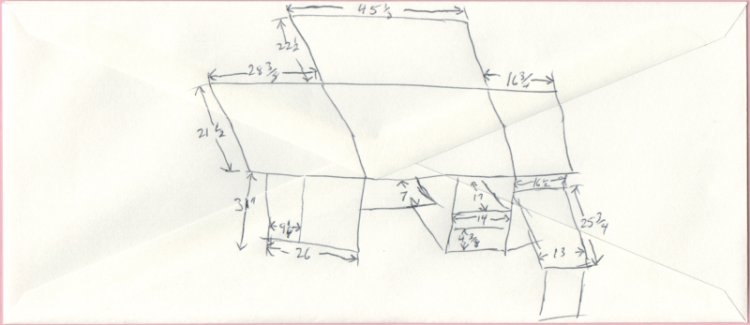
| Height of work surface above floor | 31" |
| Depth of cabinet | 21 1/2" |
| Width of top, folded | 45 1/8" |
| Width of left top section | 28 3/8" |
| Width of right top section | 16 3/4" |
| Depth of back table | 22 1/2" |
| Left/Right door panels | 16 1/2" |
| Center door panel | 9 1/4" |
| Door height | 27 1/4" |
| Sewing machine platform (insert in top) | 11" x 18 3/4" |
| Interior shelf depth | 7" |
| Serger shelf | 13" x 25 3/4" |
| Serger tray | 14 1/4" x 17" |
| Drawer height | 4 3/8" |
I used a standard 1/2" radius cove bit and roundover bit in my router table to make the rule joint. The geometry of the hinges for rule joints is tricky. Check Fine Woodworking, #138, September/October 1999, pg 62 for an excellent discussion.
The door hinges allow more than 180° opening in order to be sure and support the extension tables.
Woodhaven makes a nifty template and router bit for sewing table hinges. It's worth getting. You'll use the bit with other hinge templates that you'll be inspired to make.
I got the air lift from Rockler. I think I got the sewing cabinet hinges, and the door hinges there, too.
The large surfaces are all 3/4" oak veneer plywood, except the doors, which are solid oak.
The top panels are banded in solid oak approximately 2" wide. If I were doing it again, I might not go that wide; the mitering is very fussy. There is zero margin for error.
The end and back panels have 1/4" thick appliques that simulate rail and stile construction. I cut them with the same router bit profile that I used to make the real rails and stiles for the doors.
The top panel overhangs the back of the cabinet sufficiently to accomodate a swing-out panel that supports the rear panel when it is raised.
I attached the top to the cabinet with 5/16" flat head machine screws. There are triangular gussets in all of the corners let into dadoes on the inside surface of the cabinet just below the top. I then inlaid 1/2" blocks of oak into the plywood, then drilled for and installed threaded brass inserts to receive the machine screws. Drywall screws were just not good enough for an assembly as heavy as this with the top on.
Please feel free to e-mail me if you have any questions. I'll update this page periodically as questions are received.